本文为Cocos类游戏源代码的服务器部署提供详细步骤,适用于Cocos Creator类游戏。具体操作请参考下方图片。
Cocos类游戏源代码服务器部署步骤
一、CentOS环境部署
1.1. LNMP环境安装:PHP 7.1、MySQL 5.7
1.1.1. 基础运行库安装
yum install wget
yum install unzip
1.1.2. 下载集成环境安装包,地址:oneinstack
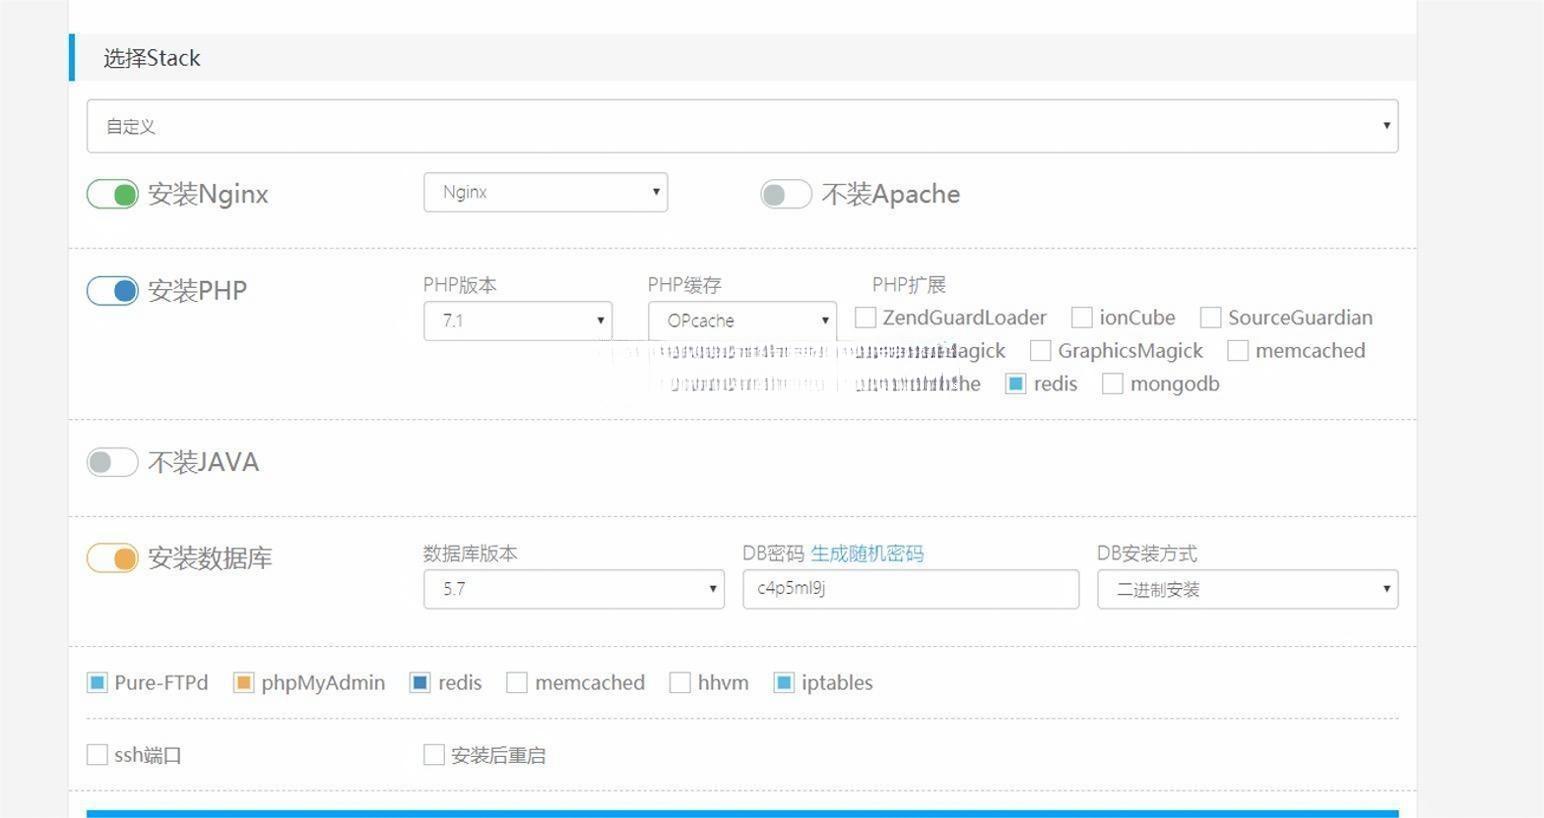
1.1.2.1. 运行命令:
wget -c oneinstack-full.tar.gz && tar xzf oneinstack-full.tar.gz && ./oneinstack/install.sh --nginx_option 1 --php_option 6 --phpcache_option 1 --php_extensions ioncube,imagick,gmagick,fileinfo,imap,ldap,phalcon,redis,swoole --phpmyadmin --db_option 2 --dbinstallmethod 1 --dbrootpwd oneinstack --pureftpd --redis --memcached --iptables1.1.3. 检查环境变量
1.1.3.1. 执行命令:
vim /etc/profile1.1.3.2. 在文档最后一行查看是否有以下内容:
export PATH=/usr/local/php/bin:/usr/local/nginx/sbin:/usr/local/mysql/bin:$PATH如果没有,则追加,保存并退出(按ESC,然后输入:wq)。然后执行命令使环境变量立即生效:
source /etc/profile1.1.3.3. 检查是否生效:
1.1.3.4. 修改PHP配置文件:
vim /usr/local/php/etc/php.ini1.1.3.5. 搜索disable_functions,将当前内容替换为:
1.1.3.6. 保存退出(按ESC,然后输入:wq)。
1.1.4. Redis配置
1.1.4.1. 执行命令:
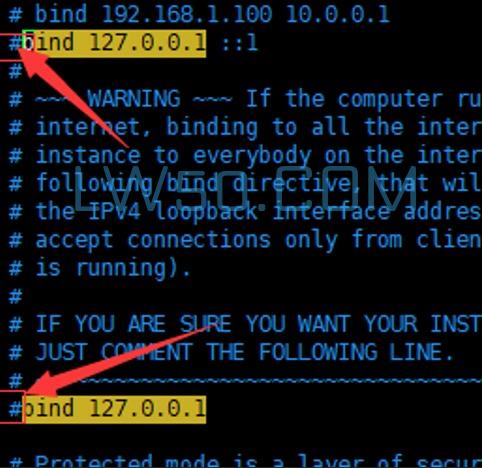
1.1.4.2. 搜索bing 127.0.0.1,前面加#注释。
1.1.4.3. 搜索protected-mode,改为:
1.1.4.4. 搜索port,可以修改端口,亦可不改。
1.1.4.5. 搜索daemonize,改为:
1.1.4.6. 搜索requirepass,取消前面的#,并设置鉴权密码。
1.1.4.7. 保存退出(按ESC,然后输入:wq)。
1.1.4.8. 重启Redis服务:
/usr/local/redis/bin/redis-server /usr/local/redis/etc/redis.conf1.1.5. MySQL配置
1.1.5.1. 进入MySQL客户端:
mysql -uroot -p1.1.5.2. 输入密码登录。
1.1.6.3. 执行以下命令以授予权限:
grant all privileges on dw.* to 'username'@'%' identified by 'password';例如:
grant all privileges on dw.* to 'dianwanuser'@'%' identified by 'dwpass##';1.1.5.3. 刷新权限:
flush privileges;1.1.5.4. 创建数据库:
CREATE DATABASE 数据库名;1.1.5.5. 导入数据库:
1.1.5.5.1. 选择数据库:
use 数据库名;1.1.5.5.2. 设置数据库编码:
set names utf8;1.1.5.5.3. 导入数据(注意SQL文件的路径):
source /home/abc/abc.sql;1.1.5.5.4. 启用group by配置:
Set @@global.sql_mode ='STRICT_TRANS_TABLES,NO_ZERO_IN_DATE,NO_ZERO_DATE,ERROR_FOR_DIVISION_BY_ZERO,NO_AUTO_CREATE_USER,NO_ENGINE_SUBSTITUTION';1.1.5.6. 退出:
exit;1.1.5.7. 如果出现group by问题,请在my.cnf中添加:
sql_mode=""1.1.5.8. 重启MySQL服务:
service mysql restart;二、站点配置
2.1. 新建虚拟主机配置
2.1.1. 执行命令:
cd /usr/local/nginx/conf2.1.2. 查看是否有vhost文件夹,没有则创建。
2.1.3. 添加platform.conf配置文件:
2.1.3.1. 执行:
vim platform.conf在文件中输入以下内容:
server { listen 86; server_name 47.110.136.29; index index.html index.htm index.php default.html default.htm default.php; root /mnt/project/platform1.0/public/; location / { add_header Access-Control-Allow-Origin *; add_header Access-Control-Allow-Credentials true; add_header Access-Control-Allow-Methods 'GET,POST,OPTIONS,HEAD,PUT'; add_header Access-Control-Allow-Headers 'DNT,X-Mx-ReqToken,Keep-Alive,User-Agent,X-Requested-With,If-Modified-Since,Cache-Control,Content-Type'; if ($request_method = 'OPTIONS') { return 206; } if (!-e $request_filename) { rewrite ^(.*)$ /index.php?s=/$1 last; break; } } location ~ \.php$ { fastcgi_split_path_info ^(.+\.php)(/.+)$; fastcgi_pass 127.0.0.1:9000; fastcgi_index index.php; include fastcgi_params; fastcgi_param SCRIPT_FILENAME $document_root$fastcgi_script_name; fastcgi_param PHP_ADMIN_VALUE "open_basedir=$document_root"; } location ~ .*\.(gif|jpg|jpeg|png|bmp|swf)$ { expires 30d; } location ~ .*\.(js|css)?$ { expires 12h; } location ~ /.well-known { allow all; } location ~ /\. { allow all; } access_log /home/wwwlogs/dianwan.plat.log; error_log /home/wwwlogs/dianwan.plat.err.log; }2.1.3.2. 保存退出(按ESC,然后输入:wq)。
2.1.4. 添加admin.conf配置文件
2.1.4.1. 执行:
vim admin.conf输入以下内容:
server { listen 87; server_name 47.110.136.29; index index.html index.htm index.php default.html default.htm default.php; root /mnt/project/admin1.0/; location / { if ($request_method = 'OPTIONS') { add_header Access-Control-Allow-Origin *; add_header Access-Control-Allow-Credentials true; add_header Access-Control-Allow-Methods 'GET,POST,OPTIONS,HEAD,PUT'; add_header Access-Control-Allow-Headers 'DNT,X-Mx-ReqToken,Keep-Alive,User-Agent,X-Requested-With,If-Modified-Since,Cache-Control,Content-Type'; return 206; } if (!-e $request_filename) { rewrite ^(.*)$ /index.php?s=/$1 last; break; } } location ~ \.php$ { fastcgi_split_path_info ^(.+\.php)(/.+)$; fastcgi_pass 127.0.0.1:9000; fastcgi_index index.php; include fastcgi_params; fastcgi_param SCRIPT_FILENAME $document_root$fastcgi_script_name; fastcgi_param PHP_ADMIN_VALUE "open_basedir=$document_root"; } location ~ .*\.(gif|jpg|jpeg|png|bmp|swf)$ { expires 30d; } location ~ .*\.(js|css)?$ { expires 12h; } location ~ /.well-known { allow all; } location ~ /\. { allow all; } access_log /home/wwwlogs/dianwan.admin.log; error_log /home/wwwlogs/dianwan.admin.err.log; }2.1.4.2. 保存退出(按ESC,然后输入:wq)。
2.1.5. 执行命令:
nginx -s reload三、平台服务器配置
3.1. 赋予用户组权限
3.2. 设置admin目录中runtime和upload目录的读写权限:
3.3. 设置platform目录中runtime目录的读写权限:
3.4. 修改platform目录内的application/config.php文件,更新以下配置:
host:Redis地址,默认为127.0.0.1port:Redis端口,默认为6379auth:Redis密码,默认为空,建议设置密码select:Redis库,默认选择0号库
3.5. 修改platform目录内的application/database.php文件,更新以下配置:
hostname:服务器地址database:数据库名username:数据库账号password:数据库密码
3.6. 修改platform目录内的application/gameconfig.php文件,更新以下配置:
SHORT_MESSAGE_URL:修改为域名,如www.xxx.com/api/mobile/sms_send
3.7. 修改application/extra/rpc.php文件,更新以下配置:
port:在server项目根目录下EasySwooleEvent.php文件的40行配置的端口,如9504
四、开启防火墙
4.1. 执行以下命令:
vim /etc/sysconfig/iptables4.2. 假设flatform项目端口配置为86端口;admin项目配置为87端口,则写入以下配置:
插入图片18位置
4.3. 然后按Esc键->按shift键+冒号->输入:wq并回车。
4.4. 执行以下命令:
service iptables restart service iptables save五、管理后台配置
5.1. 修改application/config.php文件,更新以下配置:
REDIS_HOST:Redis地址,默认为127.0.0.1REDIS_PORT:Redis端口,默认为6379REDIS_AUTH:Redis密码,默认为空,建议设置密码REDIS_SELECT:Redis库,默认选择0号库
5.2. 修改application/database.php文件,更新以下配置:
hostname:服务器地址database:数据库名username:数据库账号password:数据库密码
5.3. 修改data/extend/Redis.php文件。
六、Server配置
6.1. 修改Config/database.php文件,更新以下配置:
hostname:服务器地址database:数据库名username:数据库账号password:数据库密码
6.2. 修改Config/re.php文件,更新以下配置:
host:Redis地址,默认为127.0.0.1port:Redis端口,默认为6379password:Redis密码,默认为空,建议设置密码select:Redis库,默认选择0号库
6.3. 修改EasySwooleEvent.php文件,第40行配置端口,如9504,platform/application/extra/rpc.php里需要使用到这个端口。
七、平台服务器初始化数据操作
访问平台服务器地址:通过IP访问 -> xxx.xxx.xxx.xxx/index/reset?pwd=dfsrsdf._dfeasd
八、管理后台初始化配置操作
访问管理后台地址:通过IP访问 -> xxx.xxx.xxx.xxx/admin/Songamelist/initRedisSongame
九、Server框架启动
9.1. 进入server1.0项目根目录。
9.2. 执行命令:
php easyswoole start --d--d代表后台守护模式。
需要停止时执行:
php easyswoole stop


